Hi everyone :-)
Following on from Phil's “Getting Started – Blog CSS”, we're going to take a look at a slightly more advanced topic – using pictures for links, specifically for use with chapter navigation. This doesn't work in the same way here as it did with ning, so I'm going to talk you through one way to do this.
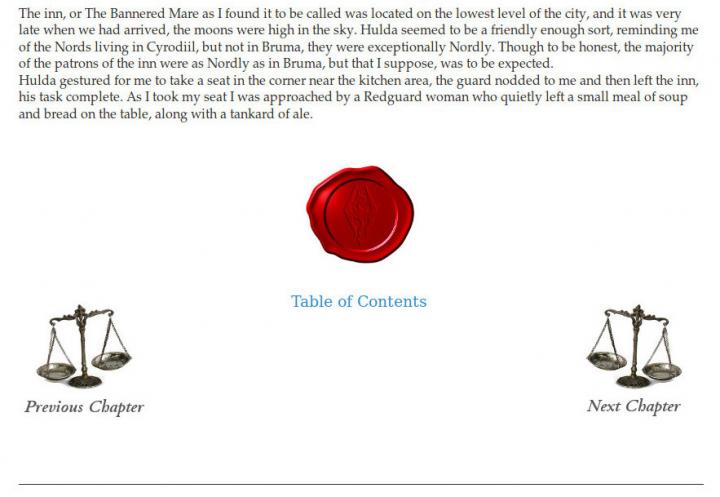
Here's an example of what we're trying to achieve:
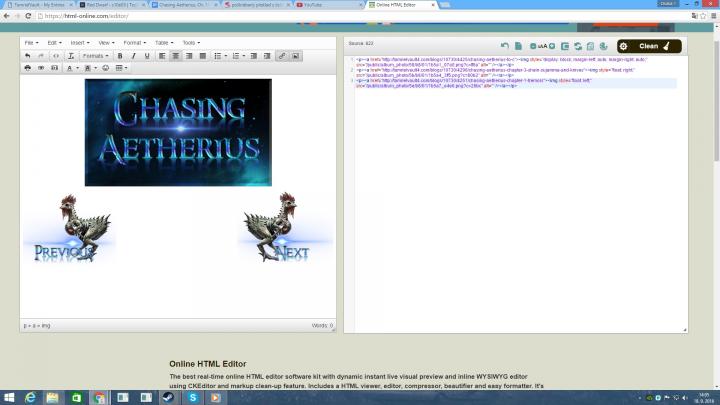
First things first, make sure you have the links for your images available. I keep all images for my story in a private album, and then for ease of reference I have a text document with all of the url's saved into it, then I can easily update or add pictures in a blog or discussion. Once you're ready, it's time to fire up the source code editor of your blog:
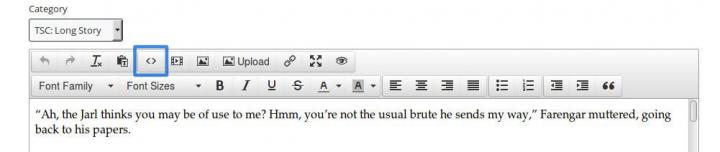
As you can see the site generates a lot of HTML code and styling properties just to make your blog look the way it does:
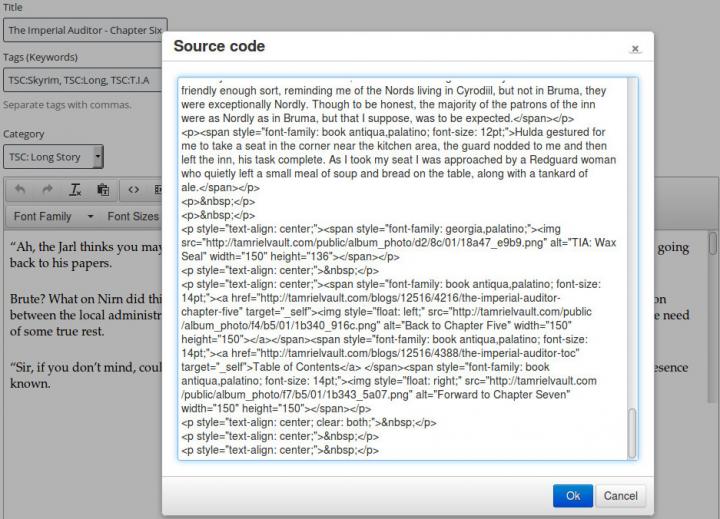
To add in images as navigation and also to place a link to the ToC, we'll be adding the following HTML and CSS, I'm going to break this down step by step and using some colour coding to make it clearer:
Firstly, if you haven't already, add a paragraph break to the end of your story (if you entered a few blank lines at the end in the normal editor, then you're all done), it's probably easier to go back into the standard editor to do this.
So, at the end of the code. We need to create a paragraph to contain our links and images, I found this was the best way to make sure everything lines up nicely:
The style property in the p tag will ensure that any text will be centred, and the span tag allows us to style a section of an element, I have kept my initial styling just in case I decide to go back to text links. After adding the opening we can now add our link. To do this we use an a tag, this is an anchor and can be used to link to other pages, and also link to another section of the current page (more on that another time if it's needed). So we open our a tag and within it add our url and target= “_self”; so it opens in the current browser window.
Next we add our image, using the img tag:
To the img tag I have added a style property “float:left”, this takes the image and literally floats it as far left as it can without interfering with anything else.
Then we add the image url using the src (source) property, I also use the alt property as this can be displayed by the browser if the image fails to load, and finally the width and height, when using numbers only, the browser assumes you mean px (pixels), so it will be handy to know these in advance. Once our image has been added, we need to close the a tag for the link. Images are elements in their own right and do not need to be closed.
Okay, so that's the back button/image added, now for the ToC, it's best to work in the order the items will be displayed, just so it's simpler.
The ToC is a little simpler and looks like most of the other links you may have added to your blogs, with one difference, it sits inside our p tag along with our images. Add your a tag with the url to your ToC and target, then add in Table of Contents and close the a tag:
We can now add our forward button/image, still in the same p tag, this is almost the same as our first section for the back button, but instead of “float:left;” we're going to use “float:right;”. Once you've added your closing tags, you can now close the span tag with /span, and then the p tag with /p . In this example I haven't got a link to add, but when I do need to add the link, I'll do it in the same way as the back button shown above, just by using the a tags for the link around it:
I had a few problems when I made the images slightly taller and added the text into the image, and I remembered there was something else we should do when using the “float” (rusty HTML and CSS brain), and that is that we should clear them afterwards.
I have also tested this in regular group posts (discussions), and it appears to work fine.
And finally, if you feel inclined to use an image for the link to your ToC, or maybe even a link to all of your blogs, here is the code to adding a single picture link:
Again, we keep everything in a p tag which has the style property “text-align: center;” , and then a for any additional text used in the same sections. We then add our a tag as previously, updating the url (I used the link for my blog summary), and then our picture using the img tag, and then closing all the tags.
Unfortunately I am unable to post the code as text, Social Engine is a little too clever for it's own good and converts it into code it can use. Please let me know if any of the images need adjusting for you to be able to read the codes correctly.
Thanks for reading, I hope you find this useful, and if you have anything to add, have comments or questions, please leave them below.
Hmm. I don´t know, seems overly complicated to me. I mean...isn´t this little bit easier?
I don´t really have time to write a guide, but I seriously recommend everyone to use Online HTML Editor in combination with Vault one. Posting discussions and everything is much easier when you combine these two editors together. Especially for editing, because SE´s discussion editing lacks things like add Link and such.
Hi Karver,
Floating is one way to do it, not the only one, it is one way I know that "should" work on most browsers as it's straight CSS, and no tables are used (which used to be the favoured way of doing complex web layouts. Unfortunately due to the site not showing full size images at the moment, I can't read your code on the left side of your screen shot, so I can't compare the two methods, I'm an old fashioned text coder though :-)
Crappy pictures...
The point is, I haven´t done a single thing with the code, I just put it together in the editor to the left and when I copy the source code into Vault it works perfectly fine. My knowledge of CSS is literally zero, mate. I´m just trying to say it is possible to do the same thing without actually messing around with CSS.
Axius Revan said:Funny story actually....
I was just trying to add a link to one of my images for my story, and all I did was highlight the selected picture and pressed the link button and typed in the destination. I didn't even touched the HTML part. :P
I tried that earlier when testing the single image link, and it replaced the image with a text link :-/ Maybe it likes you better :-)
Fair enough, everyone can use their preferred method as they find it, just throwing it out there as an option is all.
Crap. Sorry, mate, I didn´t want it to sound like I don´t appreciate what you´re doing here. I actually do, I just wanted to point out other option. Sorry.
Meli said:Axius Revan said:Funny story actually....
I was just trying to add a link to one of my images for my story, and all I did was highlight the selected picture and pressed the link button and typed in the destination. I didn't even touched the HTML part. :P
I tried that earlier when testing the single image link, and it replaced the image with a text link :-/ Maybe it likes you better :-)
Lucky me... :D I only touched the Url bar, not the "Text to Display" bar.
Karver said:Fair enough, everyone can use their preferred method as they find it, just throwing it out there as an option is all.
Crap. Sorry, mate, I didn´t want it to sound like I don´t appreciate what you´re doing here. I actually do, I just wanted to point out other option. Sorry.
No issue whatsoever Karver :-) No offence taken, darn I tried writing that last response really carefully so you wouldn't think I was upset :-( My bad, must try harder (I'll make it up to you soon, by posting more Orsimer poetry). Options are good, there's generally more than one way to do something ;-)
Meli said:Karver said:Fair enough, everyone can use their preferred method as they find it, just throwing it out there as an option is all.
Crap. Sorry, mate, I didn´t want it to sound like I don´t appreciate what you´re doing here. I actually do, I just wanted to point out other option. Sorry.
No issue whatsoever Karver :-) No offence taken, darn I tried writing that last response really carefully so you wouldn't think I was upset :-( My bad, must try harder (I'll make it up to you soon, by posting more Orsimer poetry). Options are good, there's generally more than one way to do something ;-)
Yeah. I think that for you, as someone who plays with CSS, the HTMl Editor I linked will be perfect. You have both normal and HTML editors next to each other, so you can see what are you doing. Also, for anyone else, the Online Editor is slightly better but very similar to Social Engine´s one, so I highly recommend it.
Now I will slide back into the shadows................................. :D
Teineeva said:I don't know guys, so far selecting the pic and then using the link button on the toolbar works fine for me. You're all making your lifes a lot more difficult than it needs to be I'm afraid
Strangely that doesn't work for me, this could be linked to browsers, who knows. Karver's suggestion will work well for those who want it really simple if they have a similar issue, mine is for those who are a little more advanced and still have the problem.
I've just made a couple of updates to the screen shots and wording as I noticed something I could simplify and also some formatting issues with the text.
WuYiXiang said:Karver said: We did. But it doesn't work when you want to edit discussion. You can upload URL pic, but not from your comp.This. You'll have to either upload to a private album on Tamriel Vault or go to something like Photobucket.
Not true. Here´s what I do.
If I want to edit already posted discussion, I open new discussion, upload pictures there and then I just copy the pictures from new (not posted yet) discussion into one I want to edit. Or I use the HTML Editor along with new discussion. It certainly is more work to do, but it works and honestly, I don´t see it as that big problem anymore. You always have to found some way around the system, right?
Karver said:Not true. Here´s what I do.
If I want to edit already posted discussion, I open new discussion, upload pictures there and then I just copy the pictures from new (not posted yet) discussion into one I want to edit. Or I use the HTML Editor along with new discussion. It certainly is more work to do, but it works and honestly, I don´t see it as that big problem anymore. You always have to found some way around the system, right?
As far as I can tell, uploading images into discussions ends up creating a new album for you anyway.
WuYiXiang said:Karver said:Not true. Here´s what I do.
If I want to edit already posted discussion, I open new discussion, upload pictures there and then I just copy the pictures from new (not posted yet) discussion into one I want to edit. Or I use the HTML Editor along with new discussion. It certainly is more work to do, but it works and honestly, I don´t see it as that big problem anymore. You always have to found some way around the system, right?
As far as I can tell, uploading images into discussions ends up creating a new album for you anyway.
Exactly. Means you don´t have to upload them separately.
@Todd - Originally this post was to explain how to use images for navigation between blog posts (use as a hyperlink rather than text), I offered to take a look at how to do this for another member.
Having seen how the upload feature works, I've always pre-upload images as I re-use images a lot between chapters, so the image link feature works well for this.